-
Updates & Announcements
-
340B Architect
-
340B Impact
-
340B RxCorrelate
-
340B Monitor
-
340B Written Location
-
340B Central Split
-
All About Architect Webinar Series
-
More Resources
-
Right Side Callout
-
Recent Manufacturer Notices
-
More Videos
Overview
Branch Codes are a way to minimize file imports by automatically branching specified data to another PID/HID within a hospital system. The data used for branching comes from fields within hospital and retail Drug Utilization files, Patient Encounter files, or ADT files.
- EXAMPLE: A hospital sends all hospital charges in one Drug Utilization file. In the location field, there is a location code for different areas of the hospital and certain locations are to be routed to a different PID.
Branch Codes Page
When you click Branch Codes, you will arrive to the Branch Code Details page, which will display the HID, Corporate ID, and Corporate Parent name for the Hospital selected from the dropdown. From both the Hospital dropdown menu, you can type to search by hospital name, eliminating the need to scroll through the entire list of available options.

Under Branching Setup, you can choose to view a hospital's branch code information at the HID or PID level by selecting a tab.

- The Hospital Branch Codes tab shows branching at the HID level for either Patient Encounter or ADT files.
- The Pharmacy Branch Codes tab shows branching at the PID level for either Drug Utilization or Retail Dispense files.
Under Mapped Filed, you can see whether branch codes were set up from HL7 or flat files. Note that HL7 feeds will only be used for branching Drug Utilization and Patient Encounter files.
The table below will display the first 20 branch codes and the corresponding fields.

- File Import Type: The type of file being imported and branched.
-
Column: The field in the file that 340B Architect will reference to branch the data.
- Example: The location field needs to Start with ABC123 for the data to move to the indicated HID.
-
Filter: The filter indicates what level of detail is required from the Value field.
- The filter can be Starts with, Ends with, or Equals.
- Example: The location field needs to Start with ABC123 for the data to move to the indicated HID.
-
Value: This is value 340B Architect looks for when data needs to be branched.
- Example: The location field needs to Start with ABC123 for the data to move to the indicated HID.
-
Branch from HID/PID or Import HID/PID: where the data was imported from.
-
Depending on the PID/HID you are logged into the column name could vary:
- If the PID/HID is receiving the data from another PID/HID it will say Branched from PID/HID.
- If you are logged into the PID/HID where the data is importing it will say Import HID/PID.
-
Depending on the PID/HID you are logged into the column name could vary:
- Branch to HID or Branch to PID: The HID or PID that the data will be branched to.
-
Effective Date:
- Drug Utilization files are based on the Service Date
- Retail Dispense files are based on Dispensed Date
- ADT and Patient Encounter files are based on the Discharge Date
- Termination Date: The date that the data will no longer be branched.
- Notes: Optional field for your records.
To see more branch codes, use the arrows at the bottom of the table to toggle between pages or type in the search bar for HID/PIDS or Values and click Search. Click Clear Search to return to the original table.

Exporting
Editing/Adding Branch Codes

- All fields are required except Termination Date and Notes.
- You cannot add a Termination Date in the past.
- You can edit a Termination Date if it is set in the future, but if the Termination Date is set in the past, you will have to contact Support to delete the branch code.
- The Effective Date can be set as the current date, or a date in the future. For file types other than Retail Dispense, the effective date can be set in the past. *See backdating note in next section.
- Click the Check icon to apply the branch code changes.
- The Column dropdown options correspond to the Import File Type.
- When the Import File Type is Retail Dispense, the Column dropdown options are: Store ID, NDC, RX #, and BIN.
- When the Import File Type is Drug Utilization, the Column dropdown options are: Store ID, Location, CDM, Patient Type, and Insurance.
If you would like to delete a branch code that you have added, you will have to contact the Support team for assistance.
*Backdating
If you submit a backdated branch code data move request any file type other than Retail Dispense, a message will appear letting you know the branch code was added successfully and the backdated request was queued. You will receive an email with the details of the request.
Manual Uploads
Within the Branch Codes Uploads tab, you can perform bulk Manual Uploads without contacting support for assistance.

Click Download Template and add the desired branch codes to the template.
- All fields are required except Termination Date and Notes.
-
Move Past Data: this field indicates if you would like to move historical branch code data with a particular effective date. For all file types, the default setting for this column is No.
- For ADT, Patient Encounter, and Drug Utilization files, you can change the setting to Yes to indicate that you would like to move past data.
- For Retail Dispense files, you cannot change the setting to Yes.
- Dropdown options are available in the column headers.

Click the Upload Branch Codes File button to upload your file, then click Save.
- File Type must be .csv
- Date Format is MM/DD/YYYY
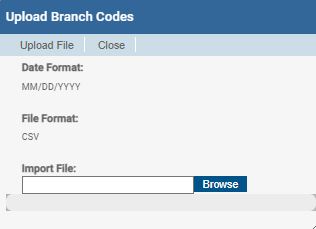
If there are any upload errors, a file will appear to the right of the Upload Status. This file can be downloaded so that any errors can be corrected and re-uploaded.

Related articles and content:
 July 2022
Table of Contents